Convert/Transcode Panasonic AG-HPX250 P2 HD MXF files to Apple ProRes for FCP X on Mac OS Lion
Panasonic AG-HPX250 P2 HD Handheld Camcorder has become the hotly received P2 HD camcorder among Panasonic's broadcasting and professional P2 HD Series. Featuring an integrated 22x zoom lens and a 2.2 Mp 1/3"-type 3MOS imager, the versatile HPX250 records not only AVC-Intra but also several flavors of DVCPRO (including DVCPRO HD) as well as DV.- Both AVC-Intra 100 and 50 modes are offered – as is DVCPRO HD, for compatibility with that very popular format. For 1080i/p, AVC-Intra 100 uses full-pixel 1920 x 1080 frames, with 10-bit quantization (4:2:2). The very bit-efficient AVC-Intra 50 codec records 1440 x 1080 video at 10-bit, 4:2:0.
- Here recommended the best P2 HD MXF files to FCP X Converter on Mac, which is also compatible with Mac OS Lion. With it, you can not only convert P2 HD MXF files to FCP X on Mac OS, but also edit your MXF files, such as cropping video size, trimming video clips, adding special effects and text/image/video watermarks to output videos, thus it will be on the top of your list.
Let’s start the conversion with the step-by-step guide on how to convert AG-HPX250 P2 HD MXF files to Apple ProRes and then import the converted videos for editing in Final Cut Pro X. - Step 1: Import Panasonic AG-HPX250 P2 HD MXF files to the top MXF to Apple ProRes Converter;
Launch the P2 HD MXF to FCP X Converter on Mac. Click the button “File” to add MXF files to it. (Note: You should find the MXF videos from one MXF whole structure folder, here we take the P2-dvcpro50 as an example: double click the P2-dvcpro50> CONTENTS> VIDEO, and then you can find the MXF file.). If it is necessary, you can double click the each file to have a preview.
Tips: 1. If you want to merge MXF files for Toshiba Thrive, just need to check the “Merge into one” box.
2. You shouldn’t move the single MXF video out of the whole MXF whole structure folder, or the MXF video would be wrong such as without audio. - Step 2: Select an output format for FCP X and set the output folder.
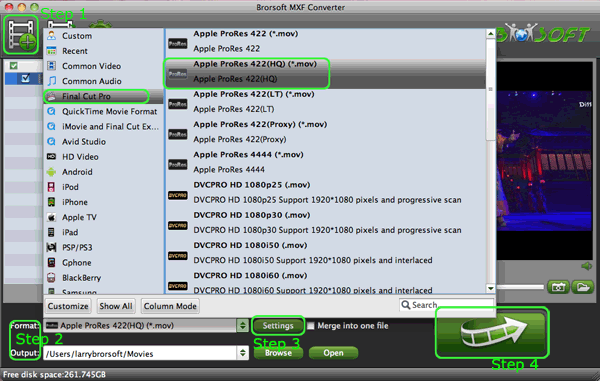
Click on the “Format” and get the dropdown menu, then move you pointer to “Final Cut Pro”. Under the sub list are there a few formats which are all compatible with FCP. Here we recommend the Apple PreRes 422(HQ) if you give the priority to the quality of the converted videos. Then you can set the output folder by clicking “Browse” icon as you need.
Note: If you want the files to be in smaller size, you can follow Final Cut Pro>Apple ProRes 422(LT)(*mov)/Apple ProRes 422(*mov) option. If your files size is at SD levels, you are advised to choose Final Cut Pro>Apple ProRes 422(Proxy)(*mov), which is recommended for 480i/p and 576i/p shootings as well. - Step 3: Click “Settings” icon to adjust audio and video parameters.
Click the “Settings” icon and you will go into a new interface named “Profile Settings”. You can adjust codec, bit rate, frame rate, sample rate and audio channel in the interface according to your needs and optimize the output file quality.
Note 1: You’d better set the video frame rate as 30fps, video size as 1920*1080 to keep the best quality for editing in Final Cut Pro, If the 60i/30fps is your original frame rate. But id you shoot with 50i/25fps, then 25fps as the frame rate will be your best choice when conversion. If you want to have a smaller file size but keep the good quality, you can change the video size to 1440*1080.
Note 2: You can customize the defaults and save them as custom conversion settings without affecting the original default selection.

- Step 4: Start converting your Panasonic AG-HPX250 P2 HD MXF files to Apple ProRes for FCP X.
Click the “Convert” button; it will transcode Panasonic AG-HPX250 P2 HD MXF to Apple ProRes for FCP X on Mac immediately. You can find the process in the “Conversion” interface.
- When the PPanasonic AG-HPX250 P2 HD MXF files to Apple ProRes conversion process is 100% completed, you will be able to get the output files for Final Cut Pro by clicking on “import” button effortlessly. Now you can easily import the converted and/or merged Panasonic AG-HPX250 P2 HD MXF files to Final Cut Pro X for editing with high quality without any trouble.
- Tips:
This Mac MXF to Toshiba Thrive Converter can also help you to convert MXF file to any other playable and editable format like MOV, Apple ProRes, DVCPRO, Avid DNxHD, AIC, etc for iPad - 2. Sony Tablet S, Nook Tablet, FCP, iMovie, Avid Studio and more portable devices and video editing programs. Learn more about it, please link to Brorsoft Mac MXF to Toshiba Thrive Converter.
Related Guide
Convert Canon XF100 1080p MXF to AIC for iMovie
Convert/Transcode MXF files to Toshiba Thrive on Mac OS X Lion
Import/Merge Canon XF100 MXF files to Windows Live Movie Maker
Convert/Import P2 MXF footage to Sony Vegas Pro 11 for editing without any trouble
Best CUDA MXF Converter- Convert MXF files to AVI, WMV, MOV, VOB, MPEG, MP4