Convert AVI files to DVD with CUDA video converter
Usually, we want to convert our DVD videos to the formal formats, such as AVI, FLV, MP4 etc formats to enjoy them in our phones, PS3 or other hard devices. However, recently, some consumers want to burn one of my AVI files to DVDs, for they want to keep them for a long time, or share their videos with their families and friends. For example, you may want to keep one videos from one website for a long time, or one video yourself shoot in the camcorders forever, however, the DVDs do not support AVI formats. Concerning the situation, you need three soft wares---CUDA video converter, IfoEdit and Imgburn.
This article will introduce you how to use CUDA video converter, IfoEdit and Imgburn to burn AVI files to DVD.- Chapter One. Convert AVI files to DVD VOB with the best CUDA video converter.
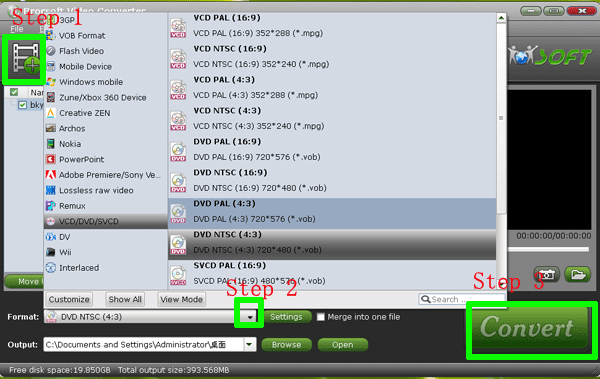
Step1. Free download CUDA video converter run and install it in your computer. Click the button as the pictures shows to load your AVI files to CUDA video converter. - Step2. Choose the DVD format for later burning use.
Click the Format option, and choose the VCD/DVD/SVCD > DVD NTSC (4:3) or VCD/DVD/SVCD > DVD PAL (4:3)(for the Europe).
Step3. Convert AVI files to DVD VOB format.
Look at the big Convert button, click it to start the conversion. with the CUDA technology, the conversion speed will be 3-5 faster than most other convert soft wares.
Attention: If you want to know more about the CUDA technology, please refer to the CUDA and video converter.
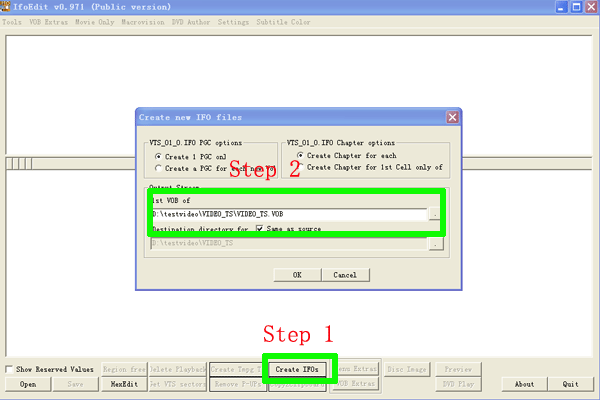
Chapter Two. Make the DVD-Video file structure - Step1. Run the IfoEdit in your computer, Click the “Create IFOs” to create IFO and BUP files for DVD. Put the output VOB files from Chapter One to a new folder---VIDEO_TS.
- Step2. In the “Create new IFO files” box, click browse box in the right side to browse the VOB file in the new folder. Look the small pane before “Same as source”, click it to make the IFO files in the same folder of the VOB files. The IFO and BUP files will be generated.
- Chapter Three: Burn the converted videos to DVD.
- Attention: Before this step, you have to have an empty DVD disc in your computer.
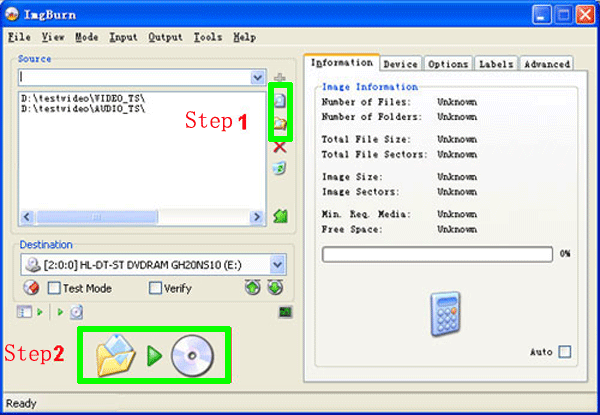
- Step1. Import the files to ImgBurn.
Run and install ImgBurn in your computer(we suggest the ImgBurn burning software, because it is free). Choose the Write files/folders to disc option to get the following box. Then, create a folder” AUDIO_TS” to guarantee the DVD can play on DVD player. Make sure the ” AUDIO_TS” folder is empty, and load the folder to ImgBurn. - Step2. Burning the files to DVD.
As the picture shows, start the burning process by clicking the button.
- More information about CUDA, please refer to:
With NVIDIA CUDA, Brorsoft DVD Ripper speeds up 3X faster than before.
Fast conversion speed--- NVIDIA CUDA Video Converter.