Convert/Transcode DSC-HX9V MTS to HDV 1080i50 for FCP to combine with Sony A1E mini DV recordings
- Q: I am trying to convert MTS files from a Sony HX9 camera to HDV 1080i50 for use in Final Cut Pro for combining with 1080i50 footage from a Sony A1E mini DV camera. The converted files are always a bit jerky regardless of which codec I use on the HX9.
- From the quoted words from one Sony DSC-HX9V user, we find that the DSC- HX9V user wants to convert the DSC-HX9V MTS files to FCP and then combine with the recordings shot by Sony A1E mini DV, but unluckily, the output files are of trouble. Of course, other Sony users may also have the similar demands.
- To solve this problem, here we recommend you the best DSC-HX9V MTS Converter for Mac, with which you can convert DSC-HX9V MTS to HDV 1080i50 for FCP to combine with Sony A1E mini DV recordings easily without any trouble. This tutorial will give you an easy and time-saved solution.
- Preparation for converting DSC-HX9V MTS to HDV 1080i50 for FCP to combine with Sony A1E mini DV recordings:
1. Software: the best DSC-HX9V MTS Converter for Mac (Free download trial version)
2. Operating system: Mac OS X 10.5 or 10.5 above - Guide: how to convert/transcode DSC-HX9V MTS to HDV 1080i50 for FCP to combine with Sony A1E mini DV recordings with the best DSC-HX9V MTS Converter for Mac
- Step 1: Import DSC-HX9V MTS to the best DSC-HX9V MTS Converter for Mac.
Use USB cable to connect Sony DSC-HX9V to your Mac. Launch DSC-HX9V MTS Converter for Mac. Click the button for adding to import DSC-HX9V MTS to the best DSC-HX9V MTS Converter for Mac.
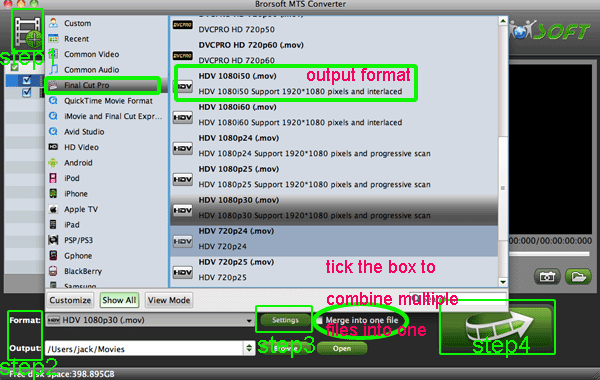
Tip: If you have multiple DSC-HX9V MTS video files, you can tick the “Merge into one” box to join the multiple video files into one single file so that you can play these files without interruption. - Step 2: Select an output format for FCP and set the output folder.
Click on the dropdown menu of “Format” and then move you pointer to “Final Cut Pro”, under the sublist there are a few formats which are all compatible with FCP. Here we choose “HDV 1080i50 (*.mov)” as an example. Then you can set the output folder by clicking “Browse” icon as you need. - Step 3: Click “Settings” icon to adjust audio and video parameters.
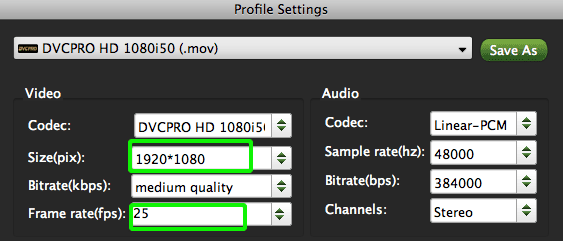
Click the “Settings” icon and you will go into a new interface named “Profile Settings”. You can adjust codec, bit rate, frame rate, sample rate and audio channel in the interface according to your needs and optimize the output file quality.
Note: You’d better set the video frame rate as 25fps, video size as 1920*1080 to keep the best quality for FCP to combine with Sony A1E mini DV recordings.
- Step 4: Start converting your DSC-HX9V MTS to HDV 1080i50 for FCP.
Click the “Convert” button; it will convert DSC-HX9V MTS to HDV 1080i50 for FCP on Mac immediately. You can find the process in the “Conversion” interface.
- After the DSC-HX9V MTS to HDV 1080i50 for FCP conversion, you will be able to get the output files for Final Cut Pro via clicking on “Open” button effortlessly. Now you can easily import the converted and merged DSC-HX9V MTS to Final Cut Pro with high quality to combine with Sony A1E mini DV recordings without any trouble.
- Tip:
Above we recommend the best DSC-HX9V MTS Converter for Mac and the give you the solution on how to convert/transcode DSC-HX9V MTS to HDV 1080i50 for FCP to combine with Sony A1E mini DV recordings. Here we’d like to introduce another application- the best Brorsoft iMedia Converter for Mac. As the best all-in-one converter, with it you can convert DSC-HX9V MTS to HDV 1080i50 and combine with Sony A1E mini DV recordings directly without using FCP.