The Canon XA20 Professional Camcorder is ideal for any type of professional content project, which has multiple recording options. It allows you to record at AVCHD video of up to 28mbps in a 1080/50P setting. Moreover, the XA20 includes two memory card slots (SDHC/SDXC) that features simultaneous recording at both low resolution mp4 and HD that facilitates easy transfer of files. This is perfect for situations wherein there has to be quick footage turnaround.
After got some AVCHD videos, most users would choose to edit these files with a popular video editing program like Adobe Premiere Pro. However, import Canon XA20 AVCHD to Premiere Pro for editing on Mac is not so easy as the users thought that many users encountered troubles- as the Premiere can’t import the recorded 1080 60P/50P AVCHD video, the frame rate is so high and the codec is not natively supported by Adobe PP for editing. Then how can we import Canon XA20 1080p MTS/M2TS to Adobe Premiere Pro?
Now we find an answer for you-- you have to convert Canon XA20 AVCHD 1080p MTS/M2TS to MPEG-2 for Adobe Premiere Pro. Here recommend Brorsoft MTS/M2TS Converter for Mac. This program is good at encoding camera shootings in AVCHD .mts/.m2ts formats to video editing software compatible file types, i.e. AIC for iMoive, ProRes for FCP, MPEG-2 for Premiere Pro, and DNxHD for Avid Media Composer and more. Besides the main conversion work, it is also equipped with some simple editing features, such as merging several videos into one file, deinterlacing the original footages, cropping video size, trimming video clips, adding special effects and subtitles to output videos, thus it will be on the top of your list. For converting Canon XA20 footage to Premiere Pro on Windows, please turn to MTS/M2TS Converter.
Download Canon XA20 to Premiere Pro Converter:

 (Note: Click here for OS X 10.5)
The correct way to import Canon XA20 MTS into Adobe Premiere Pro
Step 1: Add MTS/M2TS footage
Run the AVCHD converter, then click "Add File" button to import the Canon XA20 MTS videos to it.
Step 2: Choose a best output format
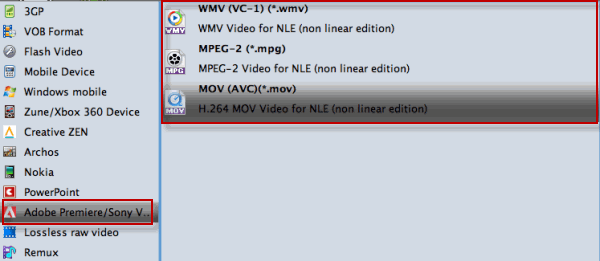
Click "Format" drop-down bar to select a proper video format. To edit AVCHD videos in Adobe Premiere, then Adobe Premiere/Sony Vegas > MPEG-2 (*.mpg) is the suitable one.
Step 3: Choose or customize the output parameters
Click “settings” to customize the output parameters: adjust the resolution, bitrate as you want. Set video size as 1920*1080, video frame rate as 25fps is better. (If the original recordings are 1080 60p, pls set 30fps)
Step 4: Start conversion
Finally, click the Convert button to start converting Canon XA20 MTS to MEPG-2 on Mac for Adobe Premiere Pro (CS4/CS5/CS5.5/CS6).
Related Guides:
How to Upload Canon XA20 AVCHD footage to iMovie/FCE
Transcode Canon XA10 MTS to MPEG-2 for Premiere Pro CS5
How to ingest Sony 50p/60p AVCHD footage to Premiere Pro
How to transfer Canon VIXIA AVCHD to Final Cut Pro
