There are a boatload of new capabilities in the Panasonic Lumix DMC-GH3 that are bound to please a lot of video shooters, the GH series' core fan base. new body, new sensor, new autofocus system, new OLED LCD and EVF, new video codec, useful new still and video features, and Wi-Fi connectivity.
Most notable for videographers, Panasonic took the surprising step of adding a full-fledged high-bit H.264 codec to circumvent the bit rate and frame rate limitations of AVCHD, which was really designed as a playback- rather than capture-optimized format. Now the camera supports up to an 80Mbps bit rate, 1080/60p and 24p, as well as an All-I codec (that's all interframes, with no temporal compression). While, there are still many users would like to choose the 1080/60p AVCHD recordings with its superb HD quality or just out of habit. Then problems occurred when loading 1080/60p AVCHD to FCP X- FCP X seems cannot ingest the 60p files well.
With the recent update of Final Cut Pro X, many users were hoping that Apple would add support for 60P/50P AVCHD; while, from some users’ feedback, 1080/60P footages can only be imported directly in FCPX when you have inserted the SD card into Mac computer's SD card slot, but only for the 1080/60P footages stored on the camcorder's internal memory. We have no choice but to use the Mac AVCHD Converter program to convert AVCHD to Apple ProRes lossless and then import to FCP X. Now, follow the step-by-step AVCHD to FCP X conversion process.
Step 1: Get the top MTS Converter for FCP X, then start it to import your Panasonic GH3 MTS files it. Check off the “Merge into one” box to combine your MTS files together if necessary.
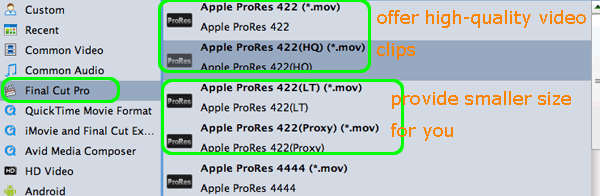
Step 2: Tap the Format icon; from the dropdown menu select Final Cut Pro > Apple ProRes 422 (HQ) (*.mov) as the target format. Of course, the ProRes 422, ProRes 422 (LT), ProRes 422 (Proxy) and ProRes 4444 are also the right choice.
Step 3: Click the “Settings” icon and you’d better set the video frame rate as 30fps, video size as 1920*1080 for editing Panasonic DMC-GH3 AVCHD in FCP X with best quality.
Step 4: Hit the “Convert” button; it will start to transcode Panasonic DMC-GH3 AVCHD to ProRes for FCP X on Mac OS X immediately. You can find the process in the “Conversion” interface.
After the 60p AVCHD to ProRes conversion, you can import converted files to FCP X, just click and choose File >> Import >> Files, and then you can load your video files to FCP X for easy editing.
Tips:
1. Learn more about this Mac AVCHD app, please link to Brorsoft MTS/M2TS Converter for Mac.
2. If you wanna import Panasonic DMC-GH3 H.264 MOV files to FCP X, you’d better apply Brorsoft Video Converter for Mac to rewrap H.264 MOV to ProRes 422 for FCP X editing.
Related guides:
Import Panasonic Lumix G5 1080p AVCHD footages to iMovie on Mac OS X
Transfer Panasonic Lumix DMC-TZ30 1080 60p/50p AVCHD to FCP/iMovie/FCE on Mac
Best Solution to Importing Panasonic Lumix G5 AVCHD Files to Final Cut Pro on Mac
Put Panasonic Lumix SZ7 AVCHD into iMovie ’11 for editing on Mac OS X
Convert Panasonic Lumix LX7 1080p AVCHD on Mac for iMovie 11/9/8
Import Panasonic Lumix G5 1080/60p AVCHD to Adobe Premiere Pro
Panasonic DMC-GH3 to FCP X, convert Panasonic GH3 MTS files, transfer Panasonic GH3 60p AVCHD to FCP Mac, Panasonic DMC-GH3 Mac, import Panasonic DMC-GH3 AVCHD to FCP X, AVCHD to FCP X Converter, join MTS files from Panasonic GH3, rewrap H.264 MOV to ProRes 422 Panasonic GH3, FCP X 1080 60p/50p support
