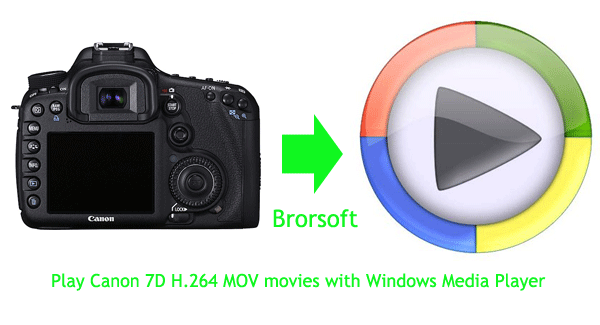
Play Canon 7D H.264 MOV movies with Windows Media Player
- The Canon EOS 7D is an 18 megapixel digital SLR camera incorporating a new APS-C CMOS sensor designed and manufactured by Canon. It records HD videos in 1080P (1920*1080) with 30/25/24 video frame rate, or 720P (1280*720) with 60/50 video frame rate. The recorded videos are in QuickTime MOV format with H.264/MPEG-4 Video Codec and uncompressed PCM audio Codec.
- When searching some information about Canon 7D, I notice that the Canon 7D owners often encounter problems of playing the 7D H.264 MOV movies with Windows Media Player, for example: “Yesterday I tried shooting some video from my 7D for the first time and when I got back and downloaded the videos to my computer, Windows media player would not show the movies? Just a black screen. Can anyone recommend a software that can playback and edit 7D videos so I can have a look at them.” The best way I recommend is to convert the Canon 7D MOV videos to WMV or AVI compatible with Windows Media Player . So just follow the step by step tutorial below with the help of Brorsoft Video Converter.

- Preparation: For the preparation of this conversion, connect Canon 7D camera to PC via USB Cable and transfer the MOV movies into hard drive.
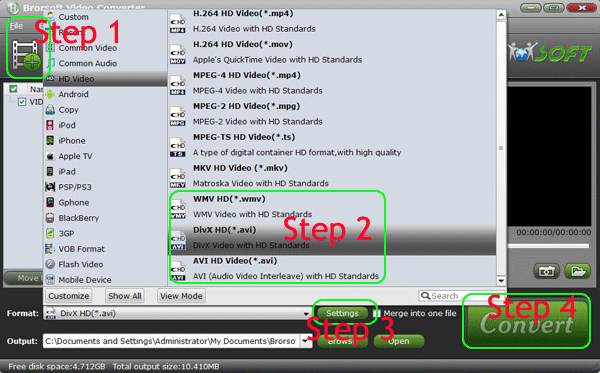
- Step 1: Load Canon 7D H.264 .mov footage to the best Canon 7D MOV Converter.
Free Download and run Brorsoft Video Converter as the best Canon 7D MOV converter. Click the "Add" button to load .mov videos from 7D camcorder.
Tips: Batch video files are allowed to be imported; therefore joining several video files into big one is supported by ticking the checkbox of “Merge into one file” under the preview window. - Step 2. Set AVI or WMV as output format for playback.
Click “Format” bar to determine output format. Follow “HD Video” template and select “WMV HD (*.wmv) or “AVI HD Video (*.avi)” as output video format.

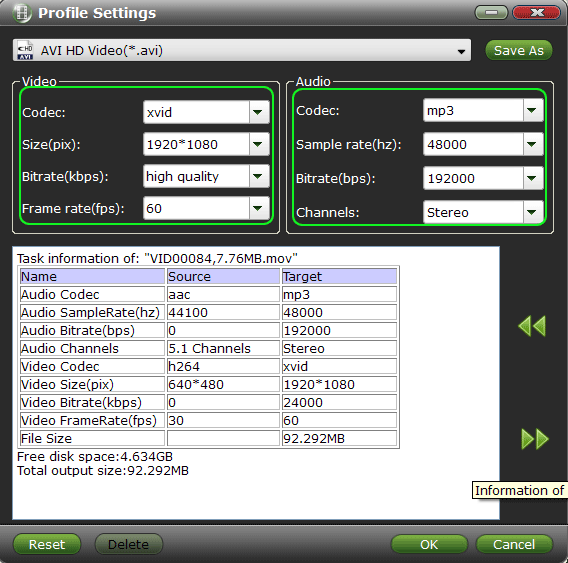
- Step 3. Adjust video and audio settings to keep 1080p or 720p HD quality.
Click "Settings" button, then you will be able to adjust audio and video parameters on the popup window to customize the output file quality, these adjustable parameters include codec name, aspect ratio, bit rate, frame rate, sample rate, and audio channel. To maintain original HD quality, you may set “original” in the fields of “Size”, “Bitrate” and “Frame rate”. To downsize the Canon 7D .mov files, just set a smaller bitrate.

- Step 4. Start converting Canon 7D MOV to AVI/WMV compatible with Windows Media Player.
Convert the big “Convert” button to start converting Canon 7D movies to AVI or WMV for further enjoyment with Windows Media Player. Brorsoft CUDA enabled Video Converter will automatically detect your CUDA/ATI-enabled graphics card if your computer is with NVIDIA? CUDA?. By enabling NVIDIA GPU Acceleration, the Canon 7D MOV Video Conversion will be processed with supercomputing on NVIDIA's GPU/ATI Stream instead of your computer's CPU, making your computer run 10x speedups. - Once the conversion is finished by Canon 7D MOV to AVI Converter, open Windows Media Player to import the output videos for playback without any problem!
- More information about the CUDA enabled Canon 7D MOV Converter :
The best CUDA enabled Video Converter is able to convert the original footages shot by Canon, Sony, Nikon and Panasonic DSLR Cameras such as Canon EOS 7D/500D/550D/600D/1100D, Sony AlphaA230L, Sony A55VHZ, Nikon D3000/D3100/D5100/D700, Panasonic Lumix DMC-GH2/GH3, DMC-G3, DMC-G2, etc. for further playing/editing/burning with Windwos Media Player, Windows Movie Maker, Sony Vegas, Adobe Premiere, Pinnacle Studio, Magix Movie Edit Pro, Nero, Roxio Toast Titanium and more.
 Trust ourselves & embrace the world!