The JVC GY-HMQ10 is the world's first hand held camcorder capable of capturing and recording real-time video at 4 times the resolution of full HD—3840 x 2160 images at 24p, 50p and 60p. Now you can deliver stunning cinema-quality recordings with the same ease of operation as a standard HD video camera.
Great images begin with a great optical system. The GY-HMQ10 employs a razor sharp F2.8 10x zoom lens specifically designed for 4K imaging. A high speed 1/2-inch class CMOS device with 8.3 million active pixels (3840 x 2160) captures live progressive images at up to 60 frames per second.
The GY-HMQ10 also functions as an exceptional HD camcorder thanks to its larger 4K imager and superb optics. It records full HD (1920 x 1080) at 50/60p or 50/60i onto a single memory card in the AVCHD format.
MAIN FEATURES:
1/2.3" Back-illuminated CMOS Sensor (8.3 million active pixels)
Built-in optical image stabilizer
4K recording for up to 2 hours (32GB SDHC, x4)
Also functions as fully featured full-HD camcorder
Interval (time lapse) recording in both 4K and HD modes
JVC's patented "FOCUS ASSIST" function
Full HD (1920x1080) trimming function
3 assignable user buttons
2 audio channels
With the high desire of reaching outstanding quality of videos and images, many cameras and camcorders manufacturers, such as Panasonic, Sony, Canon and JVC, .etc make their every effort to realize the "dream". Now, all most camcorders are recording videos at Full HD 1080 60p(NTSC)/50p(PAL) files, which offers twice infomation than those of 60i/50i shooting mode. What's more, AVCHD becomes the popular compress format for the camcorder recordings. While we are pleased with the video quality of the recordings, the troubles are also along with us that most of editors, such as Final Cut Pro, iMovie, Sony Vegas can not recognize or support thse 60p/50p AVCHD files at all. Thus how to import 60p/50p AVCHD footages to Final Cut Pro turns out to be the first problem that AVCHD camera/camcorder users need to figure out as the user below.
"Okay, so I shot a project on this JVC HMQ10 camera that shoots AVCHD, I shot in 1080p 50fps. When I go to log and transfer it shows no data in the files. FCP knows the files are there....but will not transfer any of the footage?When I 'add selection to queue' the status circle spins, then turns into a red exclamation mark. Premiere ingests the footage fine, but FCP will not! whats going on?!"
Some people answered his question:
"FCP 7 can't import 1080p50...it is a non-standard format. FCP only recognizes standard shooting and delivery formats, like 1080p25 or 1080i50."
Yes. As the above person stated that FCP can not support 1080p50/60 footages in that these are the non-standard formats even though FCP has the Log and Transfer. Then how to change the situation? As we all know, the most compatible format for FCP editing is the Apple ProRes. So the first step for us to do is to find a best third party program to transcode JVC GY-HMQ10 AVCHD footages to ProRes for FCP editing.
Here are the simple but useful steps for you to AVCHD files to FCP on Mac OS X.
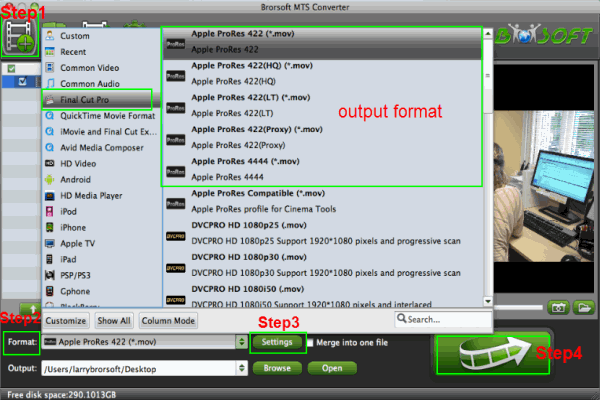
Step 1. Find a best JVC GY-HMQ10 MTS converter for mac to install, then imput the recordings to the program.
Tips: You can imput a number of files to the programs, and if necessary, you can use the function "Merge into one"
Step 2. Choose the best compatible output format--Apple ProRes for FCP.
Click the Output bar, you can finsd that there are many output format there. For FCP 7, Apple ProRes 422 is the first choice certainly.
Step 3: Adjust audio and video parameters in Profile Settings. You can change the default codec, bit rate, frame rate, sample rate and audio channel according to your needs and optimize the output file quality.
Tip: Video Size:1920*1080 & Frame Rate:30 fps(NTSC) or 25fps(PAL)
Step 4: Click the Arrow button on the main interface to start JVC GY-HMQ10 1080p converter for mac for editing in FCP 7.
After 100% accomplishment, you just need to click the "Open" button on the main interface to find your converted file. That is to say you can edit your JVC GY-HMQ10 recordings in FCP easily and effortlessly.
Tips:
1. If the supposed size of the imput files is 1GB, then the memory space should be up to 40GB.
2. Double click the selected file and you can have a preview of the imported file on the viewer.
3. Right click the imported file, you will find many functions including "Rename", "Split" and so on.
Related guides:
Convert/Transcode JVC Everio MOD to Apple ProRes for FCP on Mac
Convert JVC GS-TD1 AVCHD MTS/M2TS to Apple ProRes for editing in Final Cut Pro
Convert/Merge/Transfer JVC Everio GZ-MS120 MOD to Toshiba Thrive
Free download JVC GZ-HD6 TOD to FCP Converter- Convert/Copy/Import JVC GZ-HD6 1080/60p TOD to FCP
JVC GY-HMQ10 AVCHD 60P conversion, convert JVC GY-HMQ10 60p footages, import JVC GY-HMQ10 AVCHD into FCP 7, transcode JVC AVCHD to Final Cut Pro, MTS Converter for Mac, editing AVCHD MTS files in FCP, JVC GY-HMQ10 to FCP, JVC GY-HMQ10 Mac, JVC GY-HMQ10 and Apple ProRes
