Transfer/Copy video, picture, music media files to Droid Bionic from PC

The Motorola Droid Bionic is an Android-based, 4G LTE-capable smartphone designed by Motorola. The smartphone includes 4G LTE, Wi-Fi, HDMI output, 1 GHz OMAP dual core processor, a 4.3" HD display, 3G/4G wireless hotspot capability, GPS, an 8 MP low-light–capable camera with 1080p HD video capture and a front-facing camera capable of Video Chat. In the United States, the handset will be distributed exclusively by Verizon Wireless. In this page, we will offer some tips for the newbies of Droid Bionic how to transfer media files videos, pictures, music to Droid Bionic from PC.- Part one: Connect Droid Bionic to your PC.
1. Connect the device to the computer with the USB cable.
2. From a Home screen on the device, select Menu > Notifications.
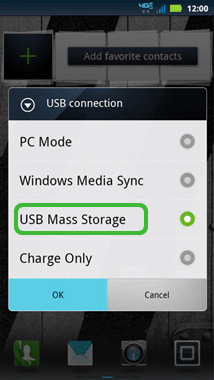
3. Select USB connection.
4. Select USB Mass Storage then select Done.

- Part two: Transfer video, picture, music media files to Droid Bionic from PC.
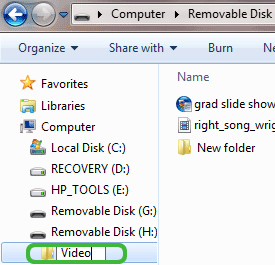
1. From File Explorer / Finder on the computer, create a new video folder in Libraries / Videos (Movies, My Videos) folder. And do as above for your picture and music files.

2. Use the computer to copy video, music, picture files into the newly created folders.
3. To further organize files, create a sub-folder in the newly created video, music, picture folder and copy desired media files into it.
4. From a Home screen on the device, select Menu > Notifications.
5. Select USB connection.
6. Select Charge Only, then select Done.
7. Disconnect the USB cable from the computer.
Note: To you can copy videos, music, pictures to Droid Bionic from PC successfully, you need to make sure these transferred media files are in supported formats of Droid Bionic. - From its official website, we find out the supported video/audio formats of Droid Bionic. Here we list below for you to have a reference.
Audio: MP3, AAC, AAC+, eAAC+, MIDI
Video: MPEG4, H.263, H.264 - Since Droid Bionic can only support achingly few video/audio formats, when you wanna transfer the videos which are not on the above supported formats list, what should you do? In that case, you have to convert the videos WMV, AVI, MKV, MOV, FLV, MOD, AVCHD etc to Droid Bionic friendly format in advance. Only in this way can you copy the videos to Droid Bionic for playback without any trouble. Here we recommend the best Droid Bionic Video Converter to you, which can help you convert any common video WMV, AVI, MKV, MOV, FLV, MOD, AVCHD, TiVo to MP4 for Droid Bionic at super fast speed within simple four steps. What’ more, with this smart Droid Bionic Video Converter, you can do some simple edit for your videos.
PS: If you are Mac users, this Droid Bionic Video Converter for Mac will be your first and best choice. - Part three: Convert video WMV, AVI, MKV, MOV, FLV, MOD, AVCHD to Droid Bionic.
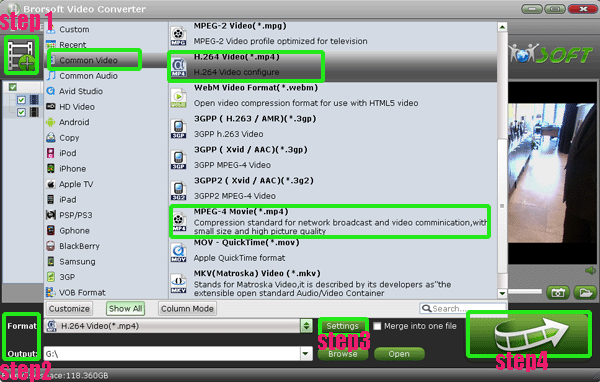
Step 1: Import AVI/MKV/WMV/FLV/AVCHD video files to the best Droid Bionic Video Converter.
Launch the best Droid Bionic Video Converter. Click the button “File” to add AVI/MKV/WMV/FLV/AVCHD video files to the best Droid Bionic Video Converter. If it is necessary, you can double click the each file to have a preview.
Tip: If you have several video files and wanna combine/merge AVI/MKV/WMV/FLV/AVCHD video files for Droid Bionic, you just need to tick off the “Merge into one” box. - Step 2: Select an output format for Droid Bionic and set the output folder.
Click on the dropdown menu of “Format” and then move your pointer to “Common Video”, under the sublist, “H.264 Video(*.mp4)”, “MPEG-4 Movie(*.mp4)”, are the compatible format to copy AVI/MKV/WMV/FLV/AVCHD video files to Droid Bionic with smooth playback. - Step 3: Click “Settings” icon to adjust audio and video parameters for Droid Bionic.
Click the “Settings” icon and you will go into a new interface named “Profile Settings”. You can adjust codec, bit rate, frame rate, sample rate and audio channel in the interface according to your needs and optimize the output file quality.
Note: You can set the Video Size as 960*540 to play videos on Droid Bionic with full screen playback. - Step 4: Start converting your AVI/MKV/WMV/FLV/AVCHD video files to MP4 for Droid Bionic.
Click the “Convert” button; it will convert AVI/MKV/WMV/FLV/AVCHD video to MP4 for Droid Bionic immediately with NVIDIA CUDA technology support. You can find the process in the “Conversion” interface. After the short conversion, you ill be able to get the output files for Droid Bionic via clicking on “Open” button effortlessly.

- Tips:
1. This Droid Bionic Video Converter is professionalize in converting videos that it can help you to convert any common video like video WMV, AVI, MKV, MOV, FLV, MOD, AVCHD, TOD, TiVo, etc to Droid Bionic or any other popular media devices like PS Vita, Transformer Prime, XOOM2, iPhone 4S, Nook Tablet, etc wanted format easily. More information get from Brorsoft Droid Bionic Video Converter.
2. If you also wanna watch DVD/Blu-ray movie on Droid Bionic, this smart Brorsoft Blu-ray Video Converter Ultimate will be your best choice. Related Guide
Easily and fast convert videos to best PS Vita Video Format MP4
Play/View HD videos/movies on Nook Color with best video player
Transfer/Copy videos, music, images to PS Vita from PS3 freely
Connect Nook Color to PC- Transfer/Copy videos, music, pictures, E-books to Nook Color from PC
Transfer/Copy videos, images, music to PS Vita from PC
Convert/Transfer/Copy AVI/MKV/WMV/FLV video files to PS Vita for smooth playback
 Trust ourselves & embrace the world!