- Store
- Products
- Downloads
- Resources
-

Tips for Editing Shadowplay Recordings in Sony Vegas Pro
"I am having a problem where my videos recorded using NVIDIAs Shadowplay feature are not being recognized by Sony Vegas anymore. The video comes out as having a green overlay on it. I've tried tweaking the settings, capture modes or reinstalling GForce Experience - nothing has helped so far."
Nvidia ShadowPlay is a hardware accelerated screen recording utility for Windows PCs using GeForce GPUs, made by Nvidia Corp as part of its GeForce Experience software. Equipped with a dedicated GPU hardware accelerated H.264 video encoder, ShadowPlay has the capacity to record videos up to 4K resolution at 130 Mbit/s with minimal performance impact to the rest of the system. Thanks to its fabulous features and wonderful nature, it has became a preferred option for most game enthusiasts to capture gaming image.
Though as gorgeous as it being, it would be quite tricky when working these amazing ShadowPlay footage with NLEs like Sony Vegas, various problems like the above described come to us. After careful searches, I eventually figured out that the basic reason might boils down to variable framerates. Since the key for ShadowPlay to export a smaller-size while keeping the great quality is to utilize variable framerates, but you know, many professional editing software like Sony Vegas can't expect anything but constant framerates. In order to tackle this issue for good, the recommended suggestion is to transcode ShadowPlay video to Sony Vegas preferred MPEG-2 or WMV videos initially and then you can easily transfer them into Sony Vegas for further editing.
Read More: How to work with Shadowplay footage in After Effects | Shadowplay footage in Premiere Pro
According to market ranking and expert's recommendation, Brorsoft Video Converter definitely worth your try. Applying it, you can effortlessly encode any ShadowPlay files to Sony Vegas Pro supported format at super fast speed effectively. Apart from Sony Vegas, it also offer powerful profiles to other NLEs, like Premiere Pro, Windows Movie Maker, Pinnacle Studio, etc to satisfy your diverse demands. Below is a brief how-to.
How to Import ShadowPlay files into Sony Vegas
Step 1: Load source ShadowPlay footage
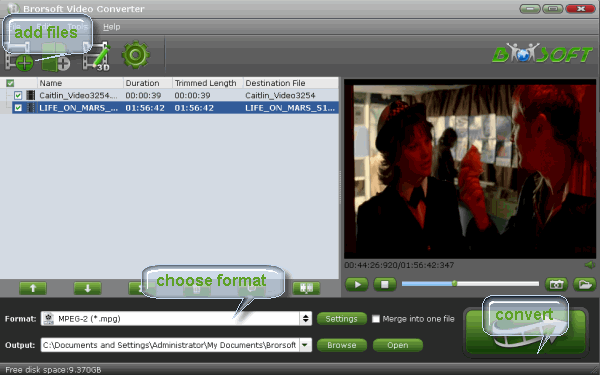
Launch the Video Converter on your PC, and you can either click "Add" button to import ShadowPlay files, or directly drag and drop the files into this program.
Step 2: Select output format
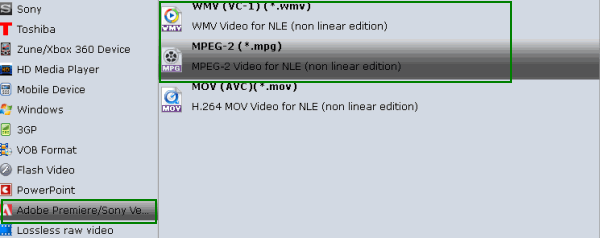
Follow "Adobe Premiere/Sony Vegas" and select "MPEG-2(*.mpg)" as the output format. Besides, you can also choose WMV (VC-1) (*.wmv) if you want to get a relatively smaller output file.
Tip: You can adjust video and audio parameters, including the Bitrate of Video and Audio, the Codec of Video and Audio, Video Size, Sample Rate, Frame Rate, Audio Channels, etc., in the Profile Settings.
Step 3: Start ShadowPlay to Sony Vegas Pro Conversion
Finally, press the convert button; it will start to transcode ShadowPlay footage to MPEG-2 for Sony Vegas Pro immediately.
Related Products
Video Converter


Useful Tips
Social Connection
Copyright © 2019 Brorsoft Studio. All Rights Reserved.