Edit Canon/Sony/Panasonic/JVC MTS in HitFilm 4 Express

Have some MTS footage shot on a Sony, Canon, Panasonic or JVC camcorder and plan to edit these files with HitFilm 4 Express? Well, based on our testing, we find that Hitfilm doesn’t handle MTS video that well from any source. So the first thing is to figure out the MTS to HitFilm 4 Express best workflow as to import and edit MTS videos in HitFilm without hassle.
As far as we know, Hitfilm 3 and 4 will directly edit the MTS clips. Whereas, Express will need the the Premium Formats add on or transcode to an editing desirable codec. There are a lot of programs online for you to choose including freeware Cliptoolz, MPEG Streamclips .etc. But since the tech support at HitFilm has assured that the best video codec to use for editing with HitFilm is the Avid DNxHD codec and also for the video format to be .mov, you’d better get a more professional video converter for transcoding your MTS footage.
Brorsoft Video Converter for Mac is one of the best choice to complete the task. Overall, the program is a professional yet easy-to-use MTS to HitFilm Express converter. With it, you can convert Canon/Panasonic/Sony/JVC AVCHD to DNxHD .mov for smoothly importing and editing in Hitfilm 4 Express, HitFilm Express 2017.
What's more, this video converter can also transcode MTS, MP4, OBS recordings and more video files for editing in Adobe Premiere Pro, Final Cut Pro, iMovie, Avid Media Composer, Davinci Resolve etc flawlessly. The equivalent Windows version is Brorsoft Video Converter, which can encode MTS files for Windows editing.
Tutorial on Transcoding MTS for Hitfilm 4 Express Best Format
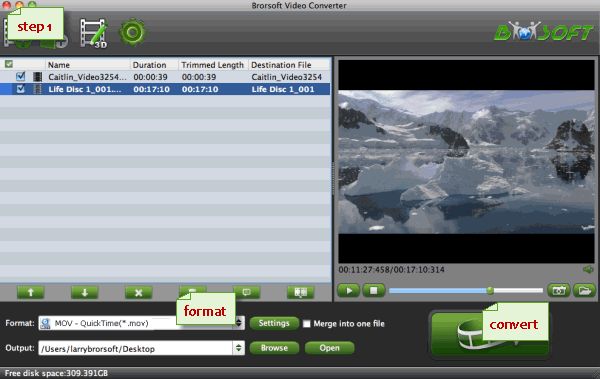
Step 1: Load MTS files
Install and run MTS Converter on Mac. Drag and drop .mts videos to this software. Or you can click "Add" button to import your MTS videos to the program.

Step 2: Specify output file format
Click format column to Choose Avid Media Composer->Avid DNxHD(*.mov) as output format for Hitfilm 4.

Tip: Adjust the video and audio parameters as the below screenshot, including the Bitrate of Video&Audio, Video Size, Sample Rate, Frame Rate, Audio Channels, etc., by clicking the "Settings" button on the main interface for getting the best quality before starting conversion.
Step 3: Start MTS to HitFilm conversion
After all necessary settings, hit Convert icon to let the conversion begin. When it finished, locate the output DNxHD files. And you can import the converted MTS video to HitFilm 4 Express to start your post workflow.
Useful Tips
- Convert MTS to ProRes High Sierra
- Upload MTS to YouTube
- Convert MTS to MOV Mac
- Convert MTS to MP4
- Convert MTS to H.265
- Convert MTS to MPEG
- Play MTS in VLC
- Upload MTS to Dropbox
- Play MTS in Plex Server
- Play MTS on Smart TV
- Join multiple MTS files
- Import MTS clips to FCP
- Import MTS clips to AE
- Convert MTS to VirtualDub
- Convert MTS to Sony Vegas
- Convert MTS to Andorid
- Convert MTS to Avid Media Composer
- Convert MTS to HitFilm 4 Express
- Convert Edit 3D AVCHD MTS
- Trancode MTS for Premiere
- Transcode MTS to Pinnacle
- Convert MTS to Camtasia Studio
- Convert MTS to Davinci Resolve
- Convert M2TS to Sony Movie Studio
- Convert MTS to Windows Movie Maker
Copyright © 2019 Brorsoft Studio. All Rights Reserved.


