Convert/Transcode Sony HDX NX70 AVCHD 1080/60p MTS/M2TS to ProRes for FCP with 5.1 channels

Sony successfully attracts everyone’s attention with the introduction of its rain- and dust-proof Sony HDX NX70. Its first-class performer, which is beneath the NX70’s weatherproofing, hits all the professional sweet spots. The back-illuminated Exmor R CMOS sensor, along with an ultra wide 26.3-263mm Sony G lens and Optical SteadyShot, provides outstanding full HD 1080p images even in low light. The Dual Rec function, meanwhile, lets you shoot 12.3MP stills while recording video. The large 3.5" (16:9) XtraFine LCD screen (921K) displays sharp, bright, vivid images, letting you compose a shot more easily and alter settings to best represent the scene, even when outdoors in bright lighting conditions.- One of the most attractive features is its capability of recording in Full High-Definition quality 1920 x 1080 with a choice of 60p, 60i and 24p frame rates, among which the 1080/60p will be the best choice since it can provide twice the info than 1080/60i. But when the users want to edit Sony HDX NX70 AVCHD 1080/60p MTS/M2TS with Final Cut Pro, they will find that FCP can not support for 1080/60p files. They need to convert AVCHD files to ProRes, which is best for editing with FCP. Then how can they Sony HDX NX70 AVCHD 1080/60p MTS/M2TS to ProRes for FCP?
- Here recommended the best Sony HDX NX70 AVCHD 1080/60p MTS/M2TS to ProRes Converter, which can perfectly fulfill its work to help you transcode your 1080/60p MTS/M2TS files to ProRes with 5.1 channels. Besides that, it is equipped with some simple but useful editing features, such as merging several videos into one file, deinterlacing the original footages, cropping video size, trimming video clips, adding special effects and text/image/video watermarks to output videos, thus it will be on the top of your list. Before you try to do the conversion, if you are also a FCP X user, please make sure that you have installed the Apple ProRes Codec manually since the FCP X asks users to install it by themselves.
- Here goes the step-by-step guide on how to convert Sony HDX NX70 AVCHD 1080/60p MTS/M2TS to ProRes with 5.1 channels for FCP, then import the converted videos for editing in Final Cut Pro, including FCP X.
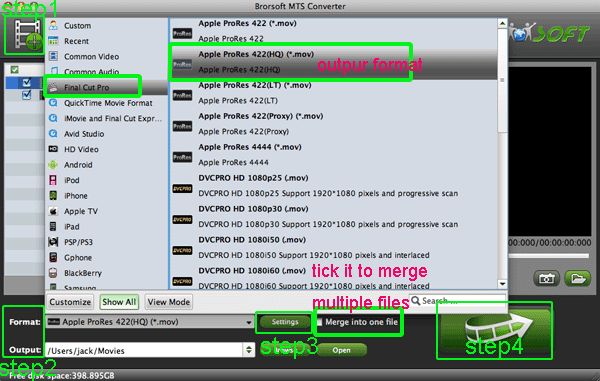
- Step1: Import Sony HDX NX70 AVCHD 1080/60p MTS/M2TS to the top Sony HDX NX70 AVCHD 1080/60p MTS/M2TS to ProRes Converter for Mac.
Connect your Sony HDX NX70 to your Apple with USB2.0. Launch Sony HDX NX70 AVCHD 1080/60p MTS/M2TS to Apple ProRes Converter for Mac and then click the adding button to import your AVCHD 1080/60p MTS/M2TS files. You can tick the box in front of the file you want to convert.
Tip: If you have multiple Sony HDX NX70 AVCHD 1080/60p MTS/M2TS files, you can select the “Merge into one” box to merge the files into one single file for FCP so that you can play these files without interruption. - Step 2: Select an output format for FCP and set the output folder.
Click on the “Format” and get the dropdown menu, then move you pointer to “Final Cut Pro”. Under the sub list are there a few formats which are all compatible with FCP. Here we recommend the Apple PreRes 422(HQ) if you give the priority to the quality of the converted videos. Then you can set the output folder by clicking “Browse” icon as you need.
Note: If you want the files to be in smaller size, you can follow Final Cut Pro>Apple ProRes 422(LT)(*mov)/Apple ProRes 422(*mov) option. If your files size is at SD levels, you are advised to choose Final Cut Pro>Apple ProRes 422(Proxy)(*mov), which is recommended for 480i/p and 576i/p shootings as well. - Step 3: Click “Settings” icon to adjust audio and video parameters.
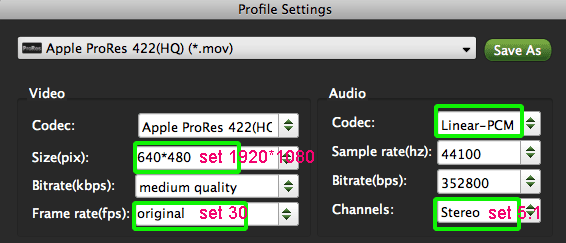
Click the “Settings” icon and you will go into a new interface named “Profile Settings”. You can adjust codec, bit rate, frame rate, sample rate and audio channel in the interface according to your needs and optimize the output file quality.
Note: You’d better set the video frame rate as 30fps, video size as 1920*1080 to keep the best quality for editing in Final Cut Pro. If you want to have a smaller file size but keep the good quality, you can change the video size to 1440*1080.

- Step 4: Start converting your Sony HDX NX70 1080/60p MTS/M2TS files to Apple ProRes for FCP.
Click the “Convert” button; it will transcode Sony HDX NX70 1080/60p MTS/M2TS to ProRes for FCP on Mac immediately. You can find the process in the “Conversion” interface.

- When the Sony HDX NX70 1080/60p MTS/M2TS to ProRes with 5.1 channels conversion process is perfectly completed, you will be able to get the output files for Final Cut Pro by clicking on “Open” button effortlessly. Now you can easily import the converted and/or merged Sony HDX NX70 AVCHD 1080/60p MTS/M2TS with 30fps to Final Cut Pro for editing with high quality without any trouble.
- Tips:
1. To get more tips for other Sony camcorders and cameras, you can refer to Sony video camera Tips and Tricks that will do you a favor. - 2. If you are interested in converting files of other formats or enjoying DVDs and BDs on your portable devices, please link to Brorsoft iMedia Converter for Mac to get more information.
- 3. Since the Thanksgiving is coming, you can get the best Sony HDX NX70 AVCHD 1080/60p MTS/M2TS to ProRes Converter at a discount price, taken 15% off. If you are interested in Brorsoft Thanksgiving Activity, please give the website a go.
Related Guide
Convert/Transcode AVCDH camera MTS/M2TS to Adobe After Effects CS5.5
Convert Sony A77 AVCHD 1080p MTS/M2TS to Adobe Premiere CS 5.5
Convert/Transcode Sony SLT A77 AVCHD 1080/60p MTS/M2TS to ProRes for FCP
Convert/Transcode Sony Alpha DSLR AVCHD 1080p MTS/M2TS to FCP & iMovie
Convert/Transcode MOV to H.264 MP4 for Sony Tablet S on Mac OS X Lion
 Trust ourselves & embrace the world!