Sony Vegas Pro 9, like previous versions of Vegas, does not support MXF files created by Panasonic camcorders such as the HVX200 or P2 MXF videos. Perhaps Sony feels little pressure to support its rival's format as a standard, out-of-the-box feature, since the need has been addressed successfully by Austin, Texas-based DVFilm with its $150 Raylight Ultra. As far as we know, DVFilm products are still the only way to use Panasonic MXF files in Vegas without having to convert the them into a different format first. Sony supports its own version of MXF (XDCAM) in Vegas, but not Panasonic's (P2); instead, Sony cooperates with DVFilm to support Panasonic MXF.
The Raylight, and now Ultra, for their core functionality, that is, coding/decoding MXF files. (Because this is their core functionality, they are often described as codecs, even though the products also include the Raylight Plug-in for Sony Vegas; RayMaker, an application that converts MXF files into AVI files; P2 Maker, an application that converts Raylight AVI into MXF files; and a control panel for the Raylight codec.) That core, according to many persons experience, is solid.
You can click Here to learn how to install the Raylight if you have a trial version of Raylight Ultra or have purchased one .
After installation, you can follow the below tutorial to edit your MXF files from P2 card in Sony Vegas natively.
How to edit with Sony Vegas and Raylight
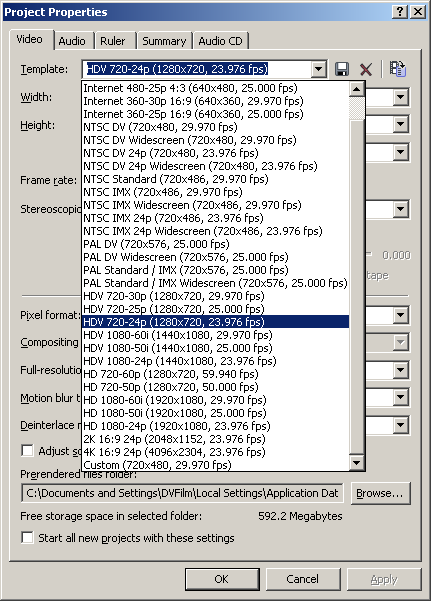
Step 1: Start Vegas Pro and click on File->Properties. The Project Properties dialog is shown at right. In the Video tab, click on the dropdown box for Template.
A. For 1280 x 720 projects, we're going to start with the HDV 720-24p template. This does not mean we are editing HDV! We are just using the Template as a convenient starting point.
B. For 1080P projects, use the HD 1080-24p template.
In the Audio tab, set the sample rate to 48,000 Hz. None of the other settings need to be changed.
You can select to Start all new projects with these settings by clicking that option at the bottom of the window.
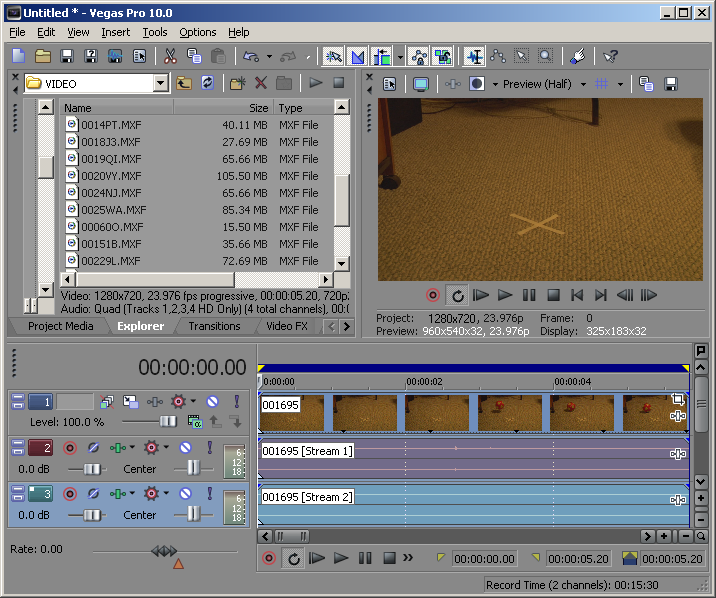
Step 2: The Vegas plug-in allows you to import P2 MXF files from the P2 Cameras like the HVX200 directly into the timeline of Sony Vegas Pro 6 or later.
Import video MXF Files into Vegas:
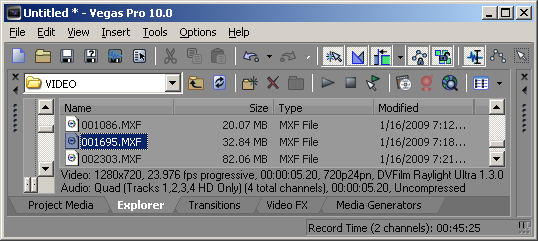
Use File->Import->Media or the Vegas Explorer to locate the MXF files in the Contents/Video folder and import them into Vegas. If the Raylight plugin is installed, when you click on an MXF file, the frame size, frame rate, and other information will be displayed as shown to the left.
Also if the soundtrack MXF files are located in the adjacent AUDIO folder, or in the same folder, the soundtrack settings will also be displayed as shown at above.
Tip: Raylight imports tracks 1 and 2 into a stereo track on the timeline. If you need access to tracks 3 and 4, use the "Import all 4 tracks" option in Raylight.
Step 3: Playback from MXF Files
The quality of the preview window can be controlled by the Vegas preview window controls and by the Raylight Control Panel. Use the Vegas "Preview Auto" mode with the preview window set to 1/2 or 1/4 actual size. A dual-processor system with fast disk drives is recommended for using the Raylight Vegas plug-in.
Step 4: Export a Movie
Exporting video (WM9, Uncompressed AVI, MPEG2) from the timeline works the same as described here. Presently however you cannot export an MXF file or author a P2 Card directly from the timeline. If you want to preview your movie on the HVX200 camera, export a Raylight AVI and use P2 Maker.
Tip:
1. Remember to select Raylight Ultraviolet (Max Quality) before rendering your movie for presentation.
2. Here is the tutorial edit AVC-Intra with Ultra and Sony Vegas for you.
From above description, we can edit our P2 and AVC-Intra footage directly in the Sony Vegas Pro 9 timeline with Raylight Ultra. While, for some users, they may feel that the Raylight Ultra with $150 is too expensive to afford.
Well, here we offer other option -- transcode P2 MXF/AVC-Intra to MPEG-2/WMV for Sony Vegas Pro via Brorosft MXF Converter which only takes 29$, but can help you to make P2 MXF compatible with Sony Vegas without quality loss.
If you are interest in this point, get more information from here: Transcoding P2 MXF footage for importing to Vegas Pro
Note: This converter not only can help you to edit your MXF videos in Sony Vegas, but can transcode your MXF videos to various common video formats for your portable devices or TV playing.
Related Guides:
How to import P2 MXF footage to Davinci Resolve
How to ingest P2 MXF files into iMovie
How to load P2 MXF videos into FCP X
