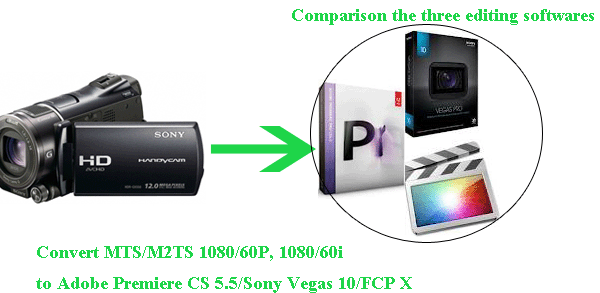
Comparison between Adobe Premiere CS 5.5, Sony Vegas 10 and FCP X as well as the best Converter for Adobe Premiere CS 5.5/Sony Vegas 10/FCP X
The premiere CS5.5 also get its traditional NLE look and set up which is very similar to FCP. Sony Vegas 10 is totally different from both but if you get used to it, it will become very comfortable to you. Comparing the Adobe Premiere CS5.5 and the Sony Vegas 10, despite the setting difference, there is a common point to make them easy to work, which is the “drag and drop” for clips into the timeline.
As for the rendering, Sony Vegas 10 will let you scrub through the clips efficiently without any long-time rendering, unless it is required to view the clips on a monitor or convert them to various formats. It also has the fantastically simple faders on the end of the clips in the timeline. Before you take advantage of the capability, you should totally get the ACID, or you’ll take some time to find how to use them. The Adobe Premiere asked you to spend some time in rendering. But with the appearance of the Adobe Premiere CS5.5, the Mercury Playback Engine uses the NVIDIA GPU Cards to provide a GPU-accelerated 32-bit color pipeline and most popular effects have been rewritten and speeded to run on it, such as the color correction, the Ultra Keyer and the motion control all run in real time. The rendering costs much less time than before.
Both Sony Vegas 10 and Adobe Premiere CS5.5 have the similar way to control audio levels inside clips with the key frames and rubber band line which are easily to use. But the 3D editing is acquired on Sony Vegas and FCP, not on the Adobe Premiere CS5.5.
According to the feedbacks I get from the market, the FCP and the Adobe Premiere CS5.5 are more favorable than Sony Vegas 10 in that both of them are more likely to use by professionals and more stable during the usage.
If you are a Windows user, the Windows Media Maker?Sony Vegas 10?Adobe Premiere CS5.5 is recommended. If you are a Mac user, you can start with the FCE, and then go to the Adobe Premiere. The iMovie and FCP are also good choices for you.- There is another point you should pay great attention to: whether you choose Adobe CS5.5 or the Sony Vegas 10, or FCP as your editing soft ware for your MTS/M2TS files, the first thing you should do is the CONVERTING! When you check for the supported input formats of the three soft wares, AVCHD MTS files are recognizable, but when you take the editing into action, you will find some problem. So the conversion is recommended before the editing.
- Now take the Sony HDR CX 160, Adobe Premiere CS 5.5 and Sony Vegas 10 for an example for Windows users. The Sony HDR-CX 160 can record your life into various optional formats, such as the HD: 1920x1080/60p, 60i, 1440x1080/60i; STD: 720x480/60i. In order to edit smoothly on the Adobe, you need to convert the MTS files to 24p MOV format. The top Sony HDR-CX 160 Adobe Premiere CS5.5/ Sony Vegas 10 Converter, the Brorsoft MTS Converter, can perfectly accomplish the task to transcode 60p/60i AVCHD to 24p MOV. You can easily fulfill the complicated work by follow the steps listed below.
- Preparation: connect the Sony HDR-CX 160 to your computer with USB cable and transfer the H.264 MTS footages into hard drive by following the camera folder AVCHD > BDMV > STREAM.
- Step 1:Import HDR-CX160 1080/60P, 1080/60i AVCHD to the best Sony CX160 AVCHD to Adobe Premiere CS5.5/Sony Vegas Converter.
Launch Sony CX160 AVCHD to Adobe Premiere/Sony Vegas Converter. Click the button for adding to import HDR-CX160 1080/60P, 1080/60i AVCHD to the best Sony CX160 AVCHD to Adobe Premiere/Sony Vegas Converter. You can tick the box in front of the file you want to convert. If it is necessary, you can double click the each file to have a preview.
Tip: If you have multiple MTS/M2TS video files, you can tick the “Merge into one” box to combine the multiple video files into one single file so that you can play these files without interruption. - Step 2: Select the output format which is specialize for Adobe/Vegas and set the output folder.
Click the format box and you will get a drop-down list in which the last but one is what you need: Adobe Premiere/Sony Vegas> MOV (AVC) (*.mov). Then you can set the output folder by clicking “Browse” icon as you prefer.
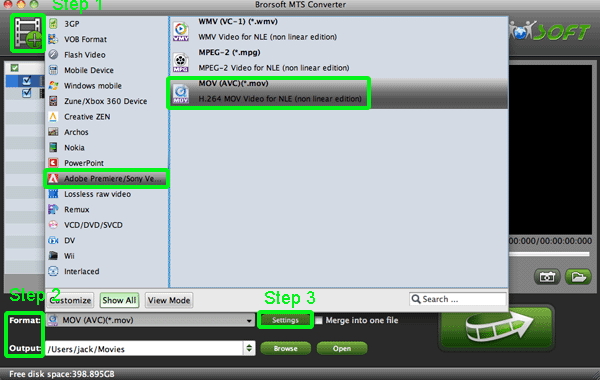
- Step 3: Click “Settings” to adjust audio and video parameters.
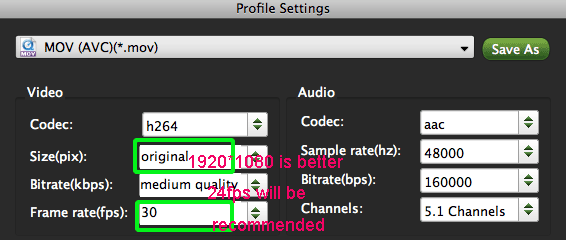
Click the “Settings” icon and you will get a new interface named “Profile Settings”. You can change the default codec, bit rate, frame rate, sample rate and audio channel according to your needs and optimize the output file quality.
Note: You’d better set the video frame rate as 24fps, video size as 1920*1080 if you attach great importance to high quality and keep 5.1 channels to keep the best quality for editing in Adobe Premiere/Sony Vegas.
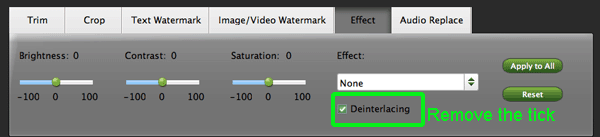
- Tip: If the frame rate of your MTS files is 60p, you'd better remove the default setting “Deinterlacing” in the “Effect”. Otherwise the converted files will be a little jerky.
- Step 4: Start converting your HDR-CX160 1080/60P, 1080/60i AVCHD MTS to MOV 24p for Adobe Premiere CS5.5/Sony Vegas.
Click the “Convert” button; it will convert/transcode the HDR-CX160 1080/60P, 1080/60i AVCHD MTS to Adobe Premiere CS5.5/Sony Vegas. You can find the process in the “Conversion” interface. - Then take the Sony HDR-CX160 1080/60i to FCP X converting as an example for Mac users since the FCP is more favorable by Mac users and the 30p is the best choice for FCP. The steps of the conversion are as follows:
- Step 1: Import Sony HDR-CX160 1080i MTS to the best Sony CX160 AVCHD to FCP X Converter.
Just as what you need above.
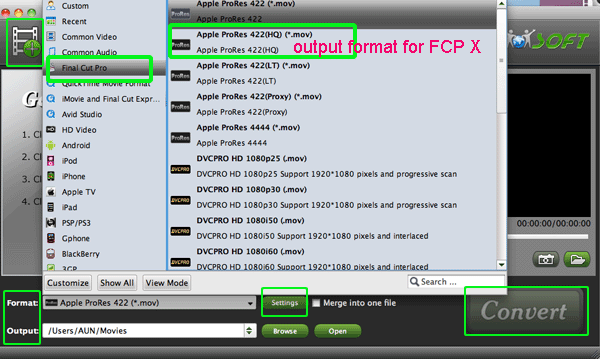
Step 2: Select an output format for FCP X and set the output folder.
Click on the dropdown menu of “Format” and then move you pointer to “Final Cut Pro”, under the sublist there are a few formats which are all compatible with FCP X. Here we choose “Apple ProRes 422(HQ) (*.mov)” as an example. Then you can set the output folder by clicking “Browse” icon as you need.
Note: If you want the files be in smaller size, you are hoped to follow Final Cut Pro> Apple ProRes 422 (*mov) or Apple ProRes 422(LT)(*mov) option. If your files size is at SD level, you are advised to choose Final Cut Pro>Apple ProRes 422(Proxy)(*mov), which is recommended for 480i/p and 576i/p shootings as well.
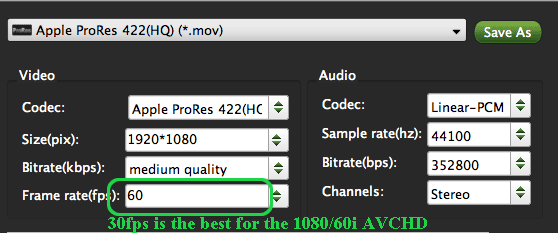
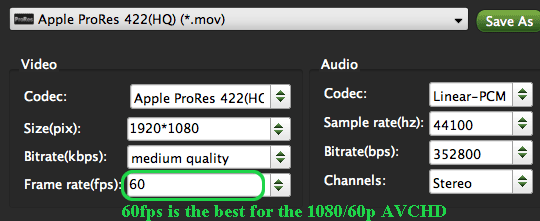
- Step 3: Click “Settings” icon to adjust audio and video parameters.
Click the “Settings” icon and you will go into a new interface named “Profile Settings” to adjust the settings. You’d better set the video frame rate as 30fps, video size as 1920*1080 to keep the best quality for editing in Final Cut Pro X.
Note: If you wanna have a smaller file size but keep the good quality, you can change the video size to 1440*1080. If yours is the 1080/60p, then the 60fps as the frame rate is the more recommended choice as the frame rate.
- Step 4: Start converting your HDR-CX160 1080/60i MTS to MOV for FCP X.
Click the “Convert” button; it will convert CX160 1080/60i MTS to FCP X on Mac immediately. You can find the process in the “Conversion” interface. - After the quick conversion, you will find the editing easy and smooth. You can get the more information if you go to the Adobe Premiere CS5.5, the Sony Vegas 10, the FCP X and the top 1080p/i MTS to Adobe Premiere CS5.5/ Sony Vegas 10 Converter as well as the best 1080i MTS to FCP X Converter.
Related Guide
Import/Convert Sony HDR-XR200 AVCHD Footage to iMovie HD
Import/Convert Sony HDR-CX160 1080/60P AVCHD Video to iMovie
Merge/Join HDR-CX155 M2TS to Final Cut Pro for editing with M2TS Joiner
Add HDR-CX520/HDR-CX500 M2TS Video to FCE 4.0 without trouble
Convert Sony HDR-CX12 AVCHD Video to MOV Compatible with FCP