Panasonic, one of the most famous camcorder manufactor, makes his every effort to promote the images and videos taken by their camcorders clearer and more vivid .
1080/60p Recording (Full-HD 1920 x 1080, 60 Progressive Recording, 50p for PAL area) is the best characteristic of Panasonic camcorders. With its transfer rate of 28 Mbps, 1080p recording conveys about twice the information of 1080i (interlace) recording, so it makes you preserve your precious memories with the highest quality. There is no doubt that it’s of great importance factor for us to choose Panasonic camcorders to take photos and record HD footages when we are travelling or on some special occasions.
But we usually meet the problems while importing the Panasonic 1080 60p AVCHD to Final Cut Pro (FCP X included) before sharing with others. As we mentioned above, 1080 60p videos contains so much information that FCP can not recognize these non-standard videos for editing. So, in order to load the 60p videos to FCP for editing smoothly, the first thing you need to do is to convert these AVCHD clips to FCP supported video formats. As we all know, the best/native supported video format for FCP is Apple ProRes 422 encoded MOV format. Now, things become easier to solve. We just need to transcode Panasonic 60p AVCHD to ProRes for Final Cut Pro 6/7/X. It can be easily done with some help from a Mac AVCHD to ProRes Converter.
To get the work done, here Brorsoft MTS/M2TS Converter Mac is highly recommended to you. The Mountain Lion AVCHD to FCP Converter supports converting MTS files shot by different Panasonic cameras to Apple ProRes for using in FCP X and FCP 7. Besides transcoding, the program is also able to merge AVCHD .mts or m2ts clips into one file. Just get it now and follow the steps to learn how to transcode and and import Panasonic 1080 60p AVCHD footage into FCP for smoothly editing.
Free Download the 60p AVCHD Converter Mac:
 (Note: Click here for OS X 10.5)
How to convert Panasonic 60p AVCHD to Apple ProRes for Final Cut Pro
Step 1: Load Source Media Files
Connect your Panasonic camcorder to your Mac with USB2.0. Launch the Panasonic MTS Converter on your Mac, and then click the adding button to import your AVCHD 1080p MTS/M2TS files. Click “Add” button and browse to the AVCHD footages either from scratch disk or cam HDD for loading to the converter.
Tip: You can select the “Merge into one” function to combine your multiple .mts/.m2ts files together.
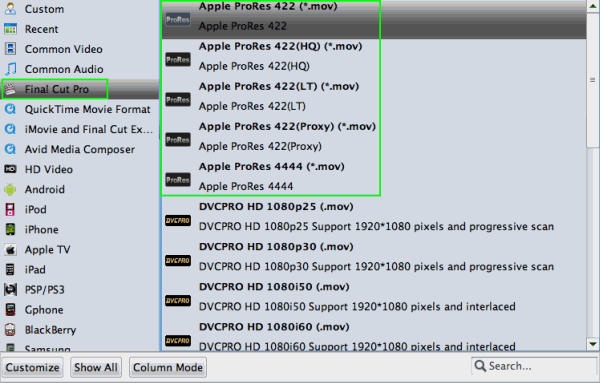
Step 2: Choose output format
Click on the “Format” to get the dropdown menu to choose one of the output format you want for FCP. Here we recommend the Apple PreRes 422.
Step 3: Click “Settings” icon to adjust audio and video parameters.
Click the “Settings” icon and you will go into a new page named “Profile Settings”. You can adjust codec, bit rate, frame rate, sample rate and audio channel in the interface according to your needs and optimize the output file quality.Note: You’d better set the video frame rate as 30fps(25fps for PAL), video size as 1920*1080 to keep the best quality for editing in Final Cut Pro.
Step 4: Start the 60p AVCHD to ProRes MOV conversion
Click the “Convert” button, it will transcode Panasonic AVCHD for Final Cut Pro 6/7/X on Mac OS X(Mountain lion included) immediately.
When the transcoding process finished, you will be able to get the output files for FCP by clicking on "Open" button effortlessly. In this way, you can effortlessly import and edit Panasonic 1080 60p AVCHD clips in Final Cut Pro for editing without any trouble.
Related guides:
How to convert and merge multiple AVCHD clips
How to import AVCHD to Premiere
How to compress AVCHD 50p files to 25p
How to load Sony MTS files to Avid MC
