- Store
- Products
- Downloads
- Resources
-

How to Work with 4K Videos in Adobe Premiere Elements

4K is hot. After recording some 4K video, more than one guys are stuck in the issue: the popular video editor like Adobe Premiere Elements definitely doesn't use the 4K especially 4K 10bit; it crashes and shuts down. This article will give you an easy to solution to import and edit 4K video in Premiere Elements beautifully. If you stick with your 4K stuff in Adobe Premiere Elements, just read on to get the problem solved.
First of all, you’d better update your Premiere Elements to the latest version. Generally, the latest Premiere Elements 2018 can handle 4K video files. In case, due to your old computer or special 4K movie source(DJI Phantom 4 Pro 4K), you’re still unable to import and play 4K in Premiere Elements with ease, turn to the workaround below.
As workaround for current 4K project in Premiere Elements, you can rewrap those files into a solid format. What we do is convert 4k into a small MPEG-2 file, which allows you to edit them in Premiere Elements directly. Brorsoft Video Converter comes out in this case.
This professional and easy-to-use 4K video converter enables you to convert 4K footage from any source to Premiere Elements edit-friendly format MPEG-2 with the best quality at fast speed. Besides Premiere Elements, this program also provides the optimal presets for Avid Media Composer, Windows Movie Maker, Adobe Premiere Pro, Pinnacle Studio, Davinci Resolve, PowerDirector, etc to meet your different needs. What's more, with this 4k video converter, you can tweak the video codec, bitrate, frame rate, audio sample rate, etc freely. For transcoding 4K on Mac OS X, please get Video Converter for Mac. Just download the software to have a smooth workflow.

Converting 4K video to work in Premiere Elements
Step 1: Add 4K video files
Run the program you just set up. Drag and drop the 4K files to the converter. You can also hit Add files button to import videos to the app.
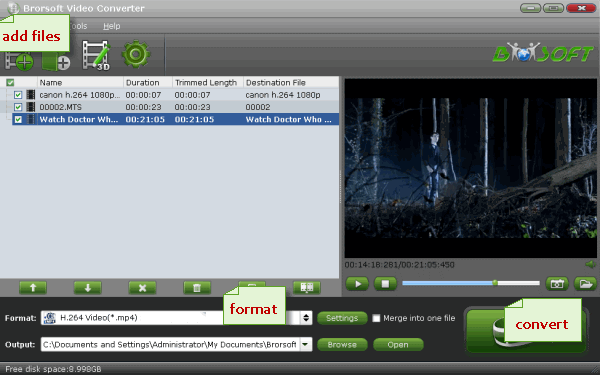
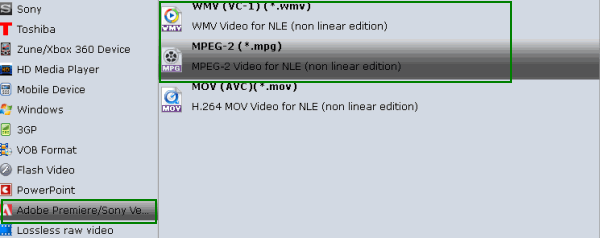
Step 2: Choose output format
Click "Format" bar and choose Adobe Premiere/Sony Vegas -> MPEG-2(*.mpg) as output format for editing 4K in Adobe Premiere Elements with natively supported video codec.
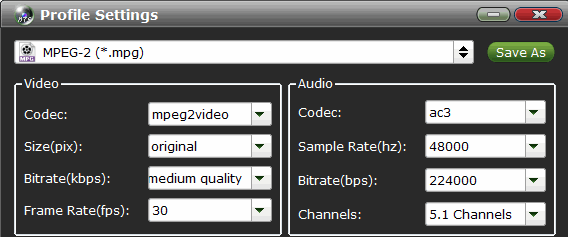
Step 3: Advanced V/A settings
Click "Settings" button if you'd like to customize advanced audio and video parameters like Video Codec, aspect ratio, bit rate, frame rate, Audio codec, sample rate, audio channels. You’re advised to set 1080p as video resolution.
Note: If you want to get original 4K resolution, just keep the video size as original.
Step 4: Start converting 4K footage
Hit the convert button of the best 4K Video Converter. It will start converting 4K for importing to Adobe Premiere Elements immediately.
Soon after the conversion, just click "Open" button to get the generated files for natively editing in Premiere Elements 2018/15/14/13 perfectly.
Related Products
Video Converter


Useful Tips
- 5 Best 4K Video Converter for Mac
- Best 4K Video Downloader
- 4K Ultra HD Video Converter
- Downscale 4K to 1080p
- 4K workflow with FCP
- 4K workflow with iMovie
- 4K workflow with Avidemux
- 4K workflow with Premiere Pro
- 4K workflow with Avid MC
- 4K workflow with Sony Vegas
- 4K Workflow with After Effects
- 4K Workflow with DaVinci Resolve
- 4K Workflow with Premiere Elements
- 4K Workflow with Movie Maker
- 4K Workflow with EDIUS
- 4K Workflow with HitFilm
- 4K Downscaling to 1080p
- 4K Workflow with PowerDirector
- 4K Workflow with Pinnacle Studio
- 4K AVC-Intra to Premiere Pro
- DJI Mavic 2 Pro 4K in Premiere Pro/FCP/Avid Media Composer
- Upload 4K Videos to YouTube
- Upload 4K Videos to OneDrive
- Play 4K in VLC
- Play 4K in Plex
- Play 4K in QuickTime
- Play 4K on Android
- Play 4K on Xbox One S
- Play 4K on Apple TV 4K
- Play 4K on Vizio TV via Kodi
- Play 4K on Shield TV via Plex
- Play 4K on PC without Lag
- Play 4K in Windows Media Player
Social Connection
Copyright © 2019 Brorsoft Studio. All Rights Reserved.