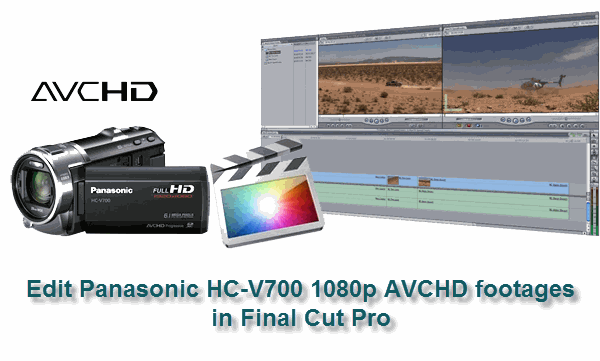
Final Cut Pro is one of the most popular NLE softwares among the videographers, independent filmmakers and cinema editors. It allows you to log and transfer videos onto a hard drive (internal or external), where they can be edited, processed, and output to a wide variety of formats, thus you can conveniently upload your videos to websites for sharing with friends and family members or burn the files to DVD/BD for different usage. Although the Final Cut Pro, including FCP 6/7 and the latest FCP X, is claimed to improve the support for editing HD, DV and SD video formats, but sometimes you will still find that the Log & Transfer is not effective while importing 1080 50p/60p AVCHD files to FCP.
If you are shooting with Panasonic's latest HC-V700, which is capable of recording Full HD videos at 50p (PAL)/ 60p (NTSC), you may be bothered by the incompatibility problem now. The best solution to the importing problem with FCP is to convert Panasonic HC-V700 AVCHD to Apple ProRes, the most compatible codec for editing in FCP. After upgrading to Final Cut Pro 7, there are five ProRes codecs working with FCP, which are Apple ProRes 422 HQ (*.mov), Apple ProRes 422 (*.mov), Apple ProRes 422 (LT) (*.mov), Apple ProRes 422 (Proxy) (*.mov) and ProRes 4444 (*.mov) for you to choose from according to your needs. Thus, the converter you are looking for should have all the five options included.
Here recommended the best AVCHD to ProRes Converter. Its great performance and all the FCP compatible formats included make it easier for you to import and edit your 1080 50p/60p files from Panasonic HC-V700 in Final Cut Pro. Besides, it is designed with some useful editing functions, including joining imported clips together for easy importing, trimming section of your file, adding text/image/video watermarks to your original files, replacing audio tracks, etc. Thus, it is the top recommendation for you.
Guide: How to convert/import Panasonic HC-V700 AVCHD MTS/M2TS files to Final Cut Pro
Step 1: Get the free trial version of the top MTS Converter for Mac, install and run it to import the 1080p recordings from Panasonic HC-V700.
Tips:
1. Double click the selected file and you can have a preview of the imported file on the viewer.
2. If you want to join the files together, please tick the box "Merge into one" on the main interface.
Step 2: Hit the Format box and select one of the Apple ProRes codecs on the dropdown list. You are advised to choose “Apple ProRes 422 (*.mov)”or “Apple ProRes 422 HQ (*.mov)” format. Due to the difference in the compresstion standard of AVCHD and ProRes 422, the converted files are significantly larger than the original ones. If you prefer smaller file size, please choose “Apple ProRes 422 (LT) (*.mov)” instead.
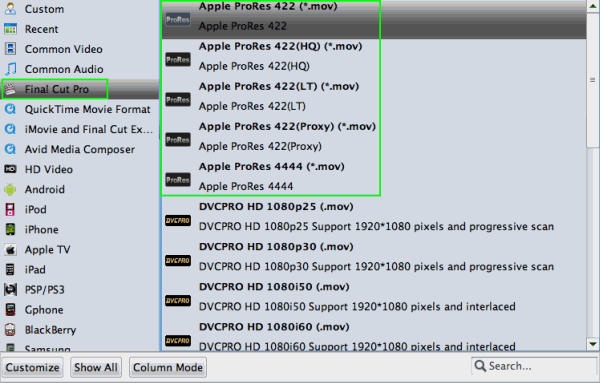
Tip: the main difference betweem the five ProRes codecs:
a. ProRes 422 (HQ): offers the utmost possible quality for 4:2:2 or 4:2:0 sources and provides target data rate of approximately 220 Mbps and higher quality than Apple ProRes 422;
b. ProRes 422: provides target data rate of approximately 145 Mbps and higher quality than Apple ProRes 422 (LT);
c. ProRes 422 (LT): provides roughly 70 percent of the data rate of Apple ProRes 422 (thus, smaller file sizes than Apple ProRes 422) and higher quality than ProRes 422 (Proxy);
d. ProRes 422 (Proxy): provides roughly 30 percent of the data rate of Apple ProRes 422 and high-quality offline editing at the original frame size, frame rate, and aspect ratio;
e. ProRes 4444: offers the utmost possible quality for 4:4:4 sources and roughly 50 percent higher than the data rate of Apple ProRes 422 (HQ).
Step 3: Adjust the video and parameters, including the Bitrate of Video and Audio, the Codec of Video and Audio, Video Size, Sample Rate, Frame Rate, Audio Channels, etc., by clicking the Settings buttion on the main interface. The screen shot listed below is our recommendation on the settings for you.
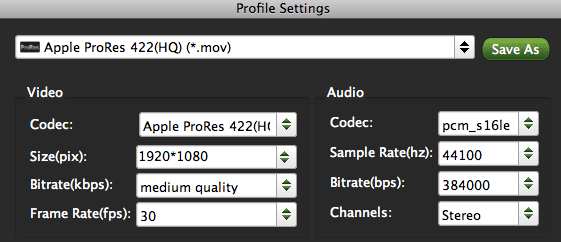
Tip: The 1920*1080 as video size and 30fps for NTSC area while 25fps for PAL area as Frame Rate are the best settings for editing in FCP.
Step 4: Click the arrow button to get the process of converting 1080p MTS files from Panasonic HC-V700 to ProRes started.
After the 1080p AVCHD to Apple ProRes conversion, you can run the Final Cut Pro and click File --> Import --> Files to import the converted files and edit them in FCP without any rendering or unrecognizable problem. In addition, if you want to make your Panasonic HC-V700 files editable in iMovie, FCE, Adobe Premiere, Avid Media Composer, etc. the AVCHD Converter will also a great choice for you. Please go to the MTS/M2TS Converter for Mac to get more info.
Related Guide:
Convert Panasonic HC-V700/500 AVCHD 1080p files to AIC for iMovie on Mac OS
Import 1080 60p/50p AVCHD Footages to Final Cut Pro
Convert/Transcode Panasonic HDC-SD900 AVCHD 1080p MTS/M2TS to Apple ProRes for FCP on MAC OS Lion
Best Solution to Importing Panasonic Lumix G5 AVCHD Files to Final Cut Pro on Mac
Final Cut Pro Import Problem - How to Transfer AVCHD Footages from Panasonic HC-X800 to FCP
convert Panasonic HC-V700 AVCHD to Apple ProRes, transfer AVCHD footages to FCP, get .m2ts files to Final Cut Pro, ingest AVCHD footages from Panasonic HC-V700 to FCP, convert MTS to ProRes 422, edit 1080p AVCHD videos in FCP, put AVCHD files to FCP, copy MTS files to FCP, make .mts/.m2ts files editable in FCP, how to import 1080/60p MTS files to FCP, Final Cut Pro importing problem, converting AVCHD to ProRes 422 for FCP, transcode AVCHD files to ProRes MOV for FCP, Mac MTS Converter for FCP, Panasonic AVCHD to FCP, Mac AVCHD to FCP Converter, MTS Final Cut Pro, AVCHD Converter for FCP, MTS to ProRes 422 Converter, MTS Converter on Mac OS X Mountain Lion, importing 1080 50p/60p AVCHD files to FCP, AVCHD to Apple ProRes Mac