- Store
- Products
- Downloads
- Resources
-

Import 4K MP4 from Panasonic HC-VX1 to Final Cut Pro
The Panasonic HC-VX1 is an affordable camera with a good looking image, better than average low light performance and UHD 4K recording. Something frustrating, users always met issues when import, play or edit Panasonic HC-VX1 4K in Final Cut Pro or other NELs.
"I have video from a Panasonic HC-VX1 that was shot in 4k. I want to edit it in Final Cut 7. How do I properly convert this footage to edit in FCP 7 so I can revert it back to 4k for coloring in post and not lose resolution in the process."
"I recorded some 4K footage on Panasonic HC-VX1 today and decided to see how it looks. I imported it into Final Cut Pro X and everything looks AMAZING, but it can’t playback well when paused. Need help."
Panasonic HC-VX1 captures 4K video up to 30 fps in .MP4. Generally, Final Cut Pro support MP4 format, but not the H.264 encoded MP4 files. What happens with an h.264 codec is that it's a?small?amount of data, but it has to be processed more by the CPU. Therefore, your computer's CPU performance takes a hit. And it’s bad for post as a general rule. It was only intended as a delivery format... not as an editing / post format.
To import Panasonic HC-VX1 4K MP4 in Final Cut Pro X/7 natively, you need to transcode Panasonic HC-VX1 4K MP4 source into something that is more editable. Apple ProRes codec is the best choice for Apple’s Final Cut Pro. You can get help from Brorsoft Video Converter for Mac to get achieve your goal.
This Mac video converter is clean and safe to install and use. With it, you can effortlessly transcode any 4K files including Panasonic HC-VX1 4K MP4 to ProRes for Final Cut Pro 7/X as well as Apple InterMediate Codec for iMovie, DNxHD for Avid Media Composer, MPEG-2 for Adobe Premiere Pro without losing quality.

READ MORE: Downscale Panasonic HC-X1 4K to 1080p | Import Panasonic HC-X1000 4K to FCP/Premiere Pro
After downloading the software on your computer and follow the guide below to learn how to ingest Panasonic HC-VX1 4K clips to FCP.
First of all, launch the best 4K to Final Cut Pro converter, click Add to load your source 4K videos.

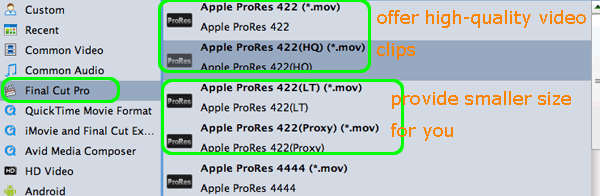
Next, decide output format. To edit with Final Cut Pro, Final Cut Pro> Apple ProRes 422(*.mov) would be the best choice.
Something else, if the default settings do not fit your needs, you can click "Settings" button to adjust audio and video parameters as you like. You can stick to 4K source or downscale 4K to 1080p for easier editing.
The last step would be to click Convert button to start transcoding Panasonic HC-VX1 4K MP4 to ProRes. Then load and edit with Final Cut Pro with smooth workflow.
Editor’s Note: Shooting 4K and scaling down to 1080 looks better because each final 1080p pixel is actually the average of 4 original 4K pixels. This "averaging" of pixels increases color accuracy, sharpness, and improves noise performance.
Related Products
Video Converter for Mac


Useful Tips
- 5 Best 4K Video Converter for Mac
- Best 4K Video Downloader
- 4K Ultra HD Video Converter
- Downscale 4K to 1080p
- 4K workflow with FCP
- 4K workflow with iMovie
- 4K workflow with Avidemux
- 4K workflow with Premiere Pro
- 4K workflow with Avid MC
- 4K workflow with Sony Vegas
- 4K Workflow with After Effects
- 4K Workflow with DaVinci Resolve
- 4K Workflow with Premiere Elements
- 4K Workflow with Movie Maker
- 4K Workflow with EDIUS
- 4K Workflow with HitFilm
- 4K Downscaling to 1080p
- 4K Workflow with PowerDirector
- 4K Workflow with Pinnacle Studio
- 4K AVC-Intra to Premiere Pro
- DJI Mavic 2 Pro 4K in Premiere Pro/FCP/Avid Media Composer
- Upload 4K Videos to YouTube
- Upload 4K Videos to OneDrive
- Play 4K in VLC
- Play 4K in Plex
- Play 4K in QuickTime
- Play 4K on Android
- Play 4K on Xbox One S
- Play 4K on Apple TV 4K
- Play 4K on Vizio TV via Kodi
- Play 4K on Shield TV via Plex
- Play 4K on PC without Lag
- Play 4K in Windows Media Player
Social Connection
Copyright © 2019 Brorsoft Studio. All Rights Reserved.