Upload CX130E 1080/50P AVCHD to YouTube on Mac keeping the best video quality

Sony HDR-CX130E supports Full HD recording at very high bit rate with 50p progressive shooting mode for highest image quality and smoothness. With the stunning features, all the HDR-CX130E users have a wonderful experience. Ever thought of uploading your 1080/50P AVCHD footages recorded by CX130E camcorder to YouTube to broadcast yourself?- However, as we know, the CX130E 1080/50P AVCHD MTS cannot be recognized by YouTube. So first of all, you should convert/transcode CX130E 1080/50P AVCHD to YouTube compatible format and then upload CX130E 1080/50P AVCHD to YouTube freely.
- Here we’ll show you the detailed methods on how to convert and upload CX130E 1080/50P AVCHD to YouTube keeping the best video quality. The professional CX130E AVCHD to YouTube Converter for Mac will be the best helper for you. Applying the CX130E AVCHD to YouTube Converter for Mac, you can convert CX130E 1080/50P AVCHD to YouTube compatible format quickly and easily. The most important is that CX130E AVCHD to YouTube Converter for Mac can transcode 1080/50P AVCHD to YouTube without any quality loss, so you can upload CX130E 1080/50P AVCHD to YouTube freely keeping the best video quality.
- Preparation for converting/uploading CX130E 1080/50P AVCHD to YouTube on Mac:
1. Software: the best CX130E AVCHD to YouTube Converter for Mac (Free download for trial version)
2. System requirement: Mac OS X 10.5 or above - Guide:
Part 1: Convert/Transcode CX130E 1080/50P AVCHD to YouTube on Mac.
First of all, you need to connect your CX130E camcorder to Apple computer via USB cable, find the .mts files by following the camera folder AVCHD > BDMV > STREAM. Then copy and transfer the .mts files from camera to the Apple hard drive disk. - Step 1: Import CX130E 1080/50P AVCHD to the best CX130E AVCHD to YouTube Converter for Mac.
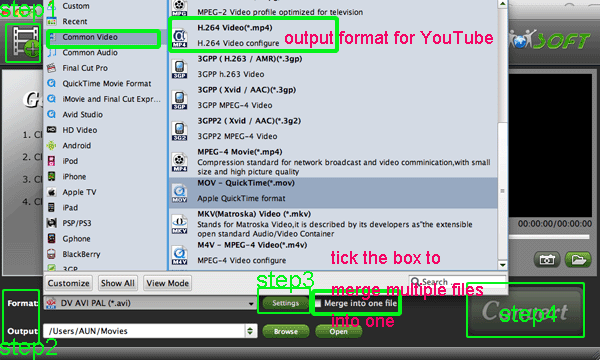
Launch CX130E AVCHD to YouTube Converter for Mac. Click the button for adding to import CX130E AVCHD to the best CX130E AVCHD to YouTube Converter for Mac.
Tip: If you have multiple MTS/M2TS video files, you can tick the “Merge into one” box to combine the multiple video files into one single file so that you can play these files without interruption. - Step 2: Select an output format for YouTube and set the output folder.
Click on the dropdown menu of “Format” and then move you pointer to Flash Video > FLV H.264 (*.flv), which will keep good video quality and best reduced file size. Besides, you can choose Common Video > H.264 Video(*.mp4) which will keep best video quality and decent file size. So the two formats are both the optimal formats for YouTube. Then you can set the output folder by clicking “Browse” icon as you need. - Step 3: Click “Settings” icon to adjust audio and video parameters.
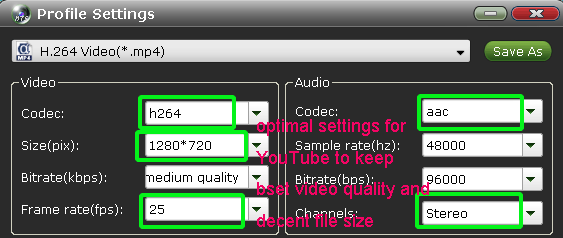
Click the “Settings” icon and you will go into a new interface named “Profile Settings”. You can adjust codec, bit rate, frame rate, sample rate and audio channel in the interface according to your needs and optimize the output file quality.
Note: You’d better set the video frame rate as 25fps, video size as 1280*720 and set audio codec as AAC stereo channel to keep the best quality for YouTube. If you want still more reduced size with MP4 make sure you set the audio to mono as it would still reduce the file size.

- Step 4: Start converting your CX130E 1080/50P AVCHD to H.264 MP4 for YouTube on Mac.
Click the “Convert” button; it will convert/transcode CX130E 1080/50P AVCHD to YouTube on Mac immediately. You can find the process in the “Conversion” interface.

- After the CX130E 1080/50P AVCHD to H.264 MP4 for YouTube conversion on Mac, you will be able to get the output files for YouTube via clicking on “Open” button effortlessly.
- Part 2: Upload CX130E 1080/50P AVCHD to YouTube on Mac.
Step 1: Go to YouTube.
Step 2: If you do not already have an account, first create one. Or go on to the next step if you already have an account.
Step 3: Log into your account.
Step 4: Click the "Upload" button on the top of the homepage. It's to the right of the search bar, next to Browse.
Step 5: Click the Upload Video button. Click "Browse" to search for the video that you wanna upload on your Apple computer. When you find the video file, click Upload Video.
Step 6: Enter the details required, the title of the video, the description of the video, what category the video should be in and the tags. Optionally, you can fill in the Broadcast Options, the Date and Map Options and the Sharing Options.
Step 7: Hit Save button and your title, description, etc. will be saved when your video has completed uploading. When the bar fills, you have posted a video on YouTube! Now you can share your masterpiece with others online. - Tip:
The professional CX130E AVCHD to YouTube Converter for Mac has powerful functions like cropping video size, trimming video clips, adding special effects and text/image/video watermarks to output videos. Link to Brorsoft AVCHD MTS Converter for Mac, you can obtain more information that you need. Related Guide
Transcode HDR-PJ30 MTS to Apple InterMediate Codec AIC MOV for iMovie
Convert HDR PJ30 H.264 Video to Apple ProRes encoded MOV for FCP
Convert HDR-PJ30E Footage to Apple InterMediate Codec AIC MOV for FCE
Convert/Transcode HDR-PJ10 1080P AVCHD Video to Apple ProRes 422 for FCP
Convert/Transode HDR-PJ10 MTS to Apple Intermediate Codec (AIC) MOV for iMovie
Get Leica D-LUX 5 720P AVCHD Lite video into iMovie 8
Burn HDR CX160 1080P MTS Videos to DVD with Toast 11 Titanium
Import Leica D-LUX 5 AVCHD Lite Movies to Final Cut Express 4
 Trust ourselves & embrace the world!